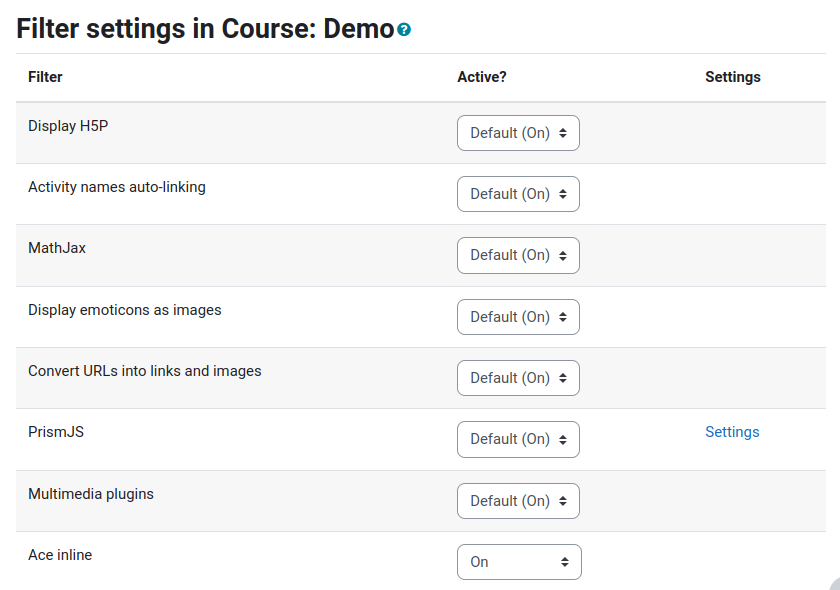
Ace-inline filter demo (updated version)
This page demonstrates the capabilities of the Ace inline Moodle filter. This filter operates on the rendered HTML of a page, so its use requires that teachers be able to edit content in HTML. See the filter documentation for details.
The original HTML of this page can be inspected by importing the description 'question' demoaceinline.xml into the question bank on your own Moodle server and opening it for edit in HTML mode. Or you can simply open that link directly in your browser, if you're able to read the XML itself and identify the relevant embedded HTML within it (essentially, all the blue text).
To revert any edited code to its original version just reload the page.
Note: the Ace inline filter requires a new version of CodeRunner that provides a sandbox web service (version 4.2.1 or later), and TinyMCE functionality requires at least Moodle 4.1, or Moodle 4.3 if you wish to edit in source mode with <script> elements.
Utilising Ace-inline filter
As of Moodle 4.1, the following code adding and editing options are available:
- Utilising the new TinyMCE editor's 'Code sample' option.
- This option is recommended for casual code authors, as the editing UI allows direct copying and pasting of code without reformatting. Note: Due to TinyMCE's quirks, certain options are limited.
- Utilising Markdown Extra, either in the Moodle plain test editor in markdown mode or externally for importing questions.This option requires Moodle 4.3 or later, due to a bug in Markdown introduced in Moodle 4.1.
- This option is recommended for code authors who may want to create questions outside of the editor in a readable format and import them into Moodle with expected behaviour.
- Editing the HTML directly in an HTML editor.
- This option is recommended for code authors who require full functionality/customisation and are comfortable using HTML.
Further information on how to use these options are detailed in the ReadMe on trampgeek/moodle-filter_ace_inline
Highlighting code
The simplest use of the filter is to let the Ace editor do syntax colouring of code. Using one of the above methods, the code will need to be wrapped in an HTML <pre> element. The attribute data-ace-highlight-code should be set in the <pre> tag. (Note: this will change to data-ace-highlight-code="" upon saving, which is equivalent.)
If using the TinyMCE option, you will not need to add any other attributes if the language chosen in the editor is the desired language to be displayed.
Otherwise, the default language is Python(3); if you want another language you should add to the <pre> element an attribute like data-lang="java". Available languages are those built into the Jobe server: python2, python3, c, cpp, java, nodejs (javascript), octave, pascal, php. Here are two examples, the first in Python, the second in Java.
A Python example
print("Some squares")
for i in range(10):
    print(i, i ** 2)
A Java example
public class hello {
    public static void main(String[] args) {
        System.out.println("Hello world!");
    }
}
Note: It is highly recommended to ensure the data- prefix is preserved for strict HTML5 compliance, as well as, to prevent unwanted editor-based stripping of attribute tags. Using this prefix is why the language attribute is called 'data-lang' rather than just 'lang'. However, if you don't care about such compliance and want to edit entirely in HTML, you can drop the prefix; the code will still work (in most instances; see ReadMe for more specific information) but will not pass HTML5 validator checks. All code in this test/demo question use the full 'data-' form for attributes.
Options for highlighting
Line numbers are not shown by default, but an attribute data-start-line-number can be added to set the line number to use on the first line. Its default value is none, resulting in no line numbers being displayed. If non-none, the usual value is '1', but other values can be used in special cases, for example, if code is broken into two separate highlighted segments.
There is also an optional attribute data-font-size to set the font size within the Ace editor.
The following example shows the Java hello world program with line numbers starting at 5 and a font-size of 16 pts.
public class hello {
    public static void main(String[] args) {
        System.out.println("Hello world!");
    }
}
Making code interactive
If an attribute of the HTML <pre> element containing the code is instead set to data-ace-interactive-code, a Try it! button is added below the Ace editor panel. When clicked, the code is sent to the CodeRunner sandbox (usually a Jobe server) for execution and the result is displayed below the button. The code can be edited and re-run an arbitrary number of times.
Here are firstly the same two examples from above, but with the attribute data-ace-interactive-code, and then C and C++ hello world programs.The following Python example will include step-by-step instructions on how to utilise HTML encoding, TinyMCE's Code sample feature and Markdown extra to execute this code snippet in a "description" type question. Make sure the ace-inline filter is set to "On" in the course:
A Python example
print("Hello squares")
for i in range(10):
    print(i, i ** 2)
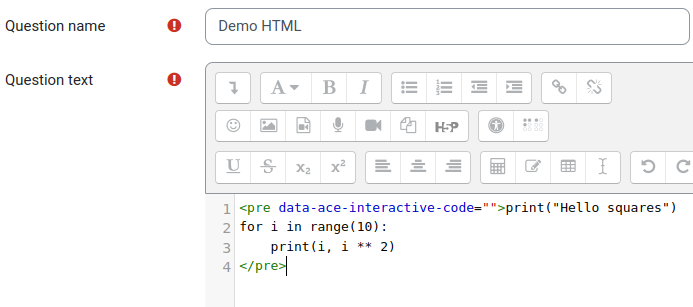
By inspecting the HTML of the above paragraph, you should see:
<pre data-ace-interactive-code="">print("Hello squares")
for i in range(10):
    print(i, i ** 2)
</pre>
By inserting this HTML directly into the HTML of an HTML editor in Moodle, then save the question and "Preview" it, you can utilise this Ace interactive feature.
- Below is an example of inserting the HTML directly into the Atto Editor's HTML editor.
- If you wish to use any language aside from Python, insert the language in the <pre> tag as data-lang="language" where "language" is your desired language wrapped in a string, e.g. data-lang="java". Further customisation options are listed in "The complete set of options:" section further down on this page.
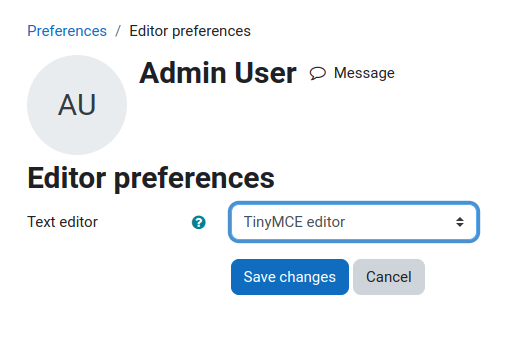
This method also works for TinyMCE editor, however, there is an easier way to edit code in Moodle 4.1+.
- Ensure your editor is set to TinyMCE (not legacy).
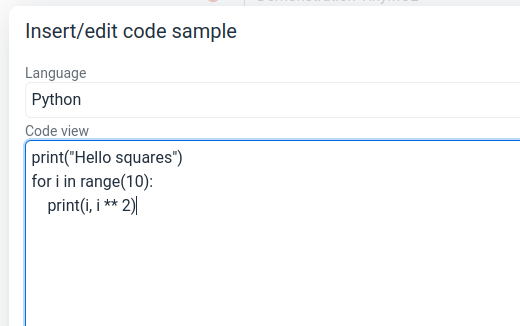
- Select "Code sample..." under the "Insert" tab.

- Select the language you desire (the current Jobe server supports Java, C(++) and Python. HTML/XML will accept HTML and display it.
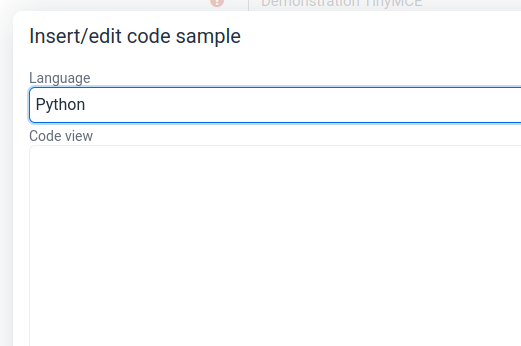
- Type/copy-and-paste the code you wish to execute in the area below and press "Save".
- The following will be displayed with in-built Prism highlighting and appear to be uneditable. To edit your code, double-click on the highlighted box.
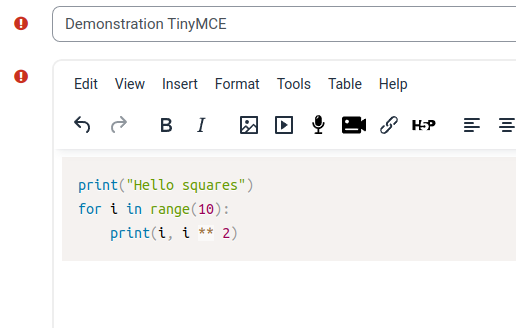
- Feel free to change languages, if you wish. This will also change the in-editor highlighting.
- Now click on "Source code" under "View". The following code should look like:
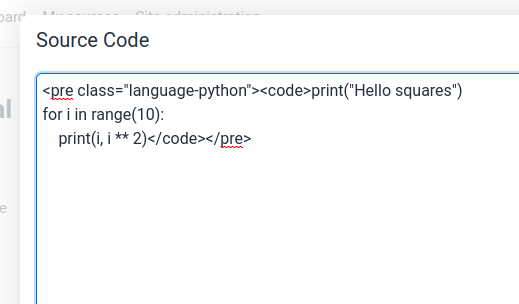
- Insert into the <pre> tag data-ace-interactive-code as shown.
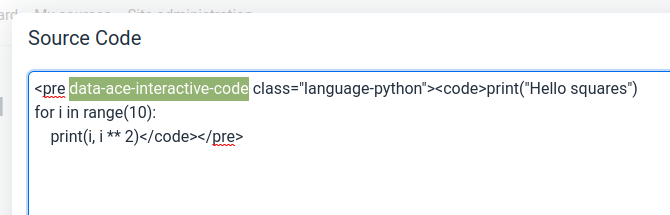
- Click "Save" and "Save changes and continue editing". You can now preview the question and see ace-inline filter applied and executable:

- When editing the question, you can freely change languages and add more data- prefixed attributes to get your desired output (note: read caveats at the bottom of the ReadMe). If the language is not available, the recommendation is to change the displayed language to HTML/XML and insert data-lang="language" in the same manner as using the HTML editor.
A Java example
public class hello {
    public static void main(String[] args) {
        System.out.println("Hello world!");
     }
 }
Hello world in C
#include <stdio.h>
int main() {
    puts("Hello world!");
}
Hello world in C++
#include <iostream>
using namespace std;
int main() {
    cout << "Hello world" << endl;
}
Providing standard input (the new approved way)
Using stdin in conjunction with interactive samples is problematic if users are expecting an interactive prompt-read-prompt-read style of standard input. This really isn't possible with this filter because clicking Try it! simply sends a job to the Jobe server for execution and then displays the results. However, the author can provide the user with a text area into which they can enter any standard input (in general, multiple lines) which are then read on demand by the program. The data-stdin-taid attribute of the <pre> element specifies the text area (or other HTML element with an element.innerText attribute) to be used in this way. For example:
Standard input:
while 1:
    try:
        print(input())
    except EOFError:
        break
If the author wishes to provide fixed uneditable standard input they can simply hide the textarea.
Providing standard input (the old deprecated way)
If there is no data-stdin-taid attribute, the question author can provide a standard input string using the attribute data-stdin. Since HTML5 allows multiline literal strings, the stdin stream can be multiline too.
The following example shows a Python program that reads standard input until EOF. The stdin attribute here is
Chaos reigns within.
Reflect, repent, and reboot.
Order shall return.
while 1:
    try:
        print(input())
    except EOFError:
        break
Providing files
Files can uploaded into the working directory of the program in two different ways. Both require the author to add additional HTML elements to the page. Note: only pure text files are supported at present. If you wish to upload binary files, you will need to first encode them in a text format such as base64 and then use a code-mapper to decode them back to the original binary format before using them.
The two upload methods are as follows.
- Named strings, or pseudo-files, can be defined by the data-file-taids attribute. This is a JSON object mapping filenames (fixed by the question author) to the IDs of textareas on the same page. The user can enter text into the textareas to define the pseudo-file contents prior to clicking Try it! The question author can hide the textareas if they wish to fix the file contents, e.g. as support files for the run.
- Actual files can be uploaded by the user via a standard <input type="file"> element by the data-file-upload-id attribute, which is the HTML element ID of the <input> element. These files are also accessible on the command line argv, therefore code can be implemented to ensure that any type of file can be accepted.
If both attributes are defined, files uploaded via the uploader override any identically named pseudo-files.
Pseudo file example: an HTML encoder
Copy the text that you wish to HTML encode into the text area, then click Try it!
from html import escape
with open('raw.txt') as infile:
    raw = infile.read()
    if len(raw.strip()) == 0:
        print("NO INPUT SUPPLIED!")
    else:
        print(escape(raw))
File upload example: an HTML encoder
Select a single file of type .txt, then click Try it!
import os
from html import escape
text_files = [filename for filename in os.listdir() if filename.endswith('.txt')]
if len(text_files) == 0:
    print("No '.txt' files found!")
elif len(text_files) != 1:
    print("Please upload only a single .txt file")
else:
    with open(text_files[0]) as infile:
        raw = infile.read()
        if len(raw.strip()) == 0:
            print("EMPTY FILE!")
        else:
            print(escape(raw))
File upload alternative: Print the contents of the first file
As each file uploaded can be accessed from the argv, an easier way to access files of any kind would be to parse the argv to use as a filename. The arguments are in order of upload order. You can select multiple files to upload and the following code will output the text contents of the first file
import sys

files = sys.argv[1:]
if len(files) == 0:
    print("Please upload a file")
else:
    with open(files[0]) as infile:
        contents = infile.read()
        print(contents)
The complete set of options:
The complete set of customisable elements is as follows. All functionality is supported in direct HTML editing.
| Attribute | Description | Supported/Available in: |
|---|---|---|
data-ace-lang |
The language to use for the Ace editor syntax highlighting, if different from the language of the job as run on Jobe. For example, the data-code-mapper option might be used to wrap a program in C within a Python script that is executed on Jobe. |
Highlight, Interactive, TinyMCE, Markdown |
data-button-name |
Sets the label to use for the button instead of 'Try it!' | Interactive, TinyMCE, Markdown |
data-start-line-number |
Can be set to 'none' to suppress line numbers or to an integer to start numbering with the given value | Highlight, Interactive, TinyMCE, Markdown |
data-readonly |
If set (to any value) the supplied code cannot be edited by the user | Interactive, TinyMCE, Markdown |
data-code-mapper |
The name of a global JavaScript function (i.e. an attribute of the window object) that takes as a parameter the code from the Ace editor and returns a modified version. This can be used to perform arbitrary transformations of the code the student is writing into some other program. If prefix or suffix code is supplied (see below) it is added after the code-mapper has been used. Note: prior to Moodle 4.3, the TinyMCE editor stripped out any <script> tags, so do not edit code with <script> tags in TinyMCE prior to Moodle 4.3. | Interactive, Markdown |
data-dark-theme-mode |
Selects when to use a dark mode for the Ace editor. Has values 0, 1 or 2 for no, maybe and yes. If 1 (maybe) is chosen, the dark theme will be used if the browser's prefers-color-scheme:dark media query returns a match, so this may change with browser, operating system or time of day. The default value is set by the administrator setting for the plugin. | Highlight, Interactive, TinyMCE, Markdown |
data-file-upload-id |
The ID of an HTML input element of type file, which can be used to select multiple files for uploading into the working directory when Try it! is clicked. | Interactive, TinyMCE, Markdown |
data-file-taids |
A JSON string defining a mapping from pseudo-filenames to textarea element IDs containing the pseudo-file contents. When Try it! is clicked, a file is created for each listed textarea and uploaded to the working directory. | Interactive, TinyMCE |
data-font-size |
The font size to use in the Ace editor, e.g. '11pt'. | Highlight, Interactive, TinyMCE, Markdown |
data-html-output |
If set (to any value) the output from the program is interpreted as raw html to insert into the DOM, rather than being escaped and displayed in a <p> element. | Interactive, TinyMCE, Markdown |
data-lang |
The language to use when running the task on Jobe, e.g. 'python3'. | Highlight, Interactive, TinyMCE, Markdown |
data-min-lines |
The minimum number of lines to display in the Ace editor. Default 4. | Highlight, Interactive, TinyMCE, Markdown |
data-max-lines |
The maximum number of lines to display in the Ace editor without a scrollbar. Default 50. | Highlight, Interactive, TinyMCE, Markdown |
data-max-output-length |
The limit to the displayed length of stdout and stderr strings. Strings longer than this are truncated prior to display. Default: 30,000. | Interactive, TinyMCE, Markdown |
data-params |
A JSON string of run-time parameters, passed to the Jobe engine (q.v.). For example, {"cputime": 5}, which is the default value of the attribute and sets a time limit of 5 seconds for the run. Rarely needed. |
Interactive, TinyMCE |
data-prefix |
Defines code that will be inserted before the code from the Ace editor (so the student doesn't see it). An extra newline is not inserted between the prefix and the visible code - you must insert it explicitly if you want one. If there is a code-mapper defined, the code is inserted after the mapping has taken place. | Interactive, TinyMCE, Markdown |
data-stdin (deprecated) |
Defines a string to be used as standard input when the program is run. Deprecated in favour of data-stdin-taid | Interactive |
data-stdin-taid |
Specifies the ID of a textarea element (or other HTML element with a jQuery val() method that supplies standard input to the program. | Interactive, TinyMCE, Markdown |
data-suffix |
Defines code that will be inserted after the code from the Ace editor (so the student doesn't see it). An extra newline is not inserted between the visible code and the suffix - you must insert it explicitly if you want one. If there is a code-mapper defined, the code is added after the mapping has taken place. | Interactive, TinyMCE, Markdown |
data-hidden |
Hides the Ace editor and all the code within it, leaving only the Try it! button. This can be used to hide complex code from students; whilst still allowing them to execute the code. | Interactive, TinyMCE, Markdown |
A simple data-html-output example
The following example shows how the data-html-output option works. It's only rarely useful in isolation but in conjunction with data-code-mapper and/or data-prefix and data-suffix it can be used by question authors to provide arbitrary output. The following example also changes the button name.
print("<h2>I'm a heading</h2>")
print("<ol><li>Bullet 1</li><li>Bullet 2</li></ol>")
A simple use of code-mapper
In this case we define (using a <script> element) a function called doubler that returns its parameter concatenated onto itself. The <pre> element that wraps the following code has the attribute data-code-mapper set to 'doubler'. Note: If this code is edited using TinyMCE editor prior to Moodle 4.3, the <script> element and all its components will disappear upon saving. It is crucial to avoid using the TinyMCE editor for this functionality prior to Moodle 4.3.
print("Hello world!")
A simple use of data-prefix
In the above example showing the use of stdin, the input() function was called and the result printed. But if students are using input() interactively, they expect to see what they enter from the keyboard echoed to the screen. To achieve such an effect in Python, prefix code could be added that simulates this echoing.
For example, here's a program that asks the student for their name and age and prints a message telling them their age next year.The data-stdin-taid attribute of the <pre> element has been set to 'age-text'; the id of the textarea containing "Jeremy" and "11".
name = input("What's your name? ")
age = int(input("How old are you? "))
print(f"Hi {name}, next year you'll be {age + 1}")
Displaying matplotlib images
By using the data-code-mapper option (and/or data-prefix and data-suffix) in conjunction with data-html-output it is possible, with some difficulty, to define an interactive block that will let students run matplotlib code and display both the textual output from the question and any output images. Here is an example, which also shows the use of the dark-theme mode and the use of the data-max-lines attribute (set to 15). Inspect the HTML at your peril! (Note: this exact method would not work if editing was to occur in TinyMCE prior to Moodle 4.3, because it strips <script> elements. An example of code which utilises only data-prefix and data-suffix is specified in the Github repository and is compatible with TinyMCE)
import matplotlib.pyplot as plt
import numpy as np

# Generate some text output
print("I am a line of output")
print("And so am I")

# Now the graph plotting
axes = plt.axes()
xs = np.linspace(0, 720, 200)
ys = np.sin(2 * np.pi * xs / 360)
axes.plot(xs, ys)
axes.set_title("y = sin(x)")
axes.set_xlabel('x (degrees)')
axes.set_ylabel('y')
axes.grid()
plt.show()
SQL: another example of using a code-mapper
The Jobe server does not directly support SQL as one of its languages. The SQL questions in CodeRunner are actually Python3 questions that interface with the sqlite3 program to provide a database (or an illusion of one, since sqlite3 manipulates a file rather than a full-on database).
To provide interactive Try it! boxes for SQL we need to make use of the ace-in-line data-code-mapper functionality to wrap the SQL code that the user edits in the Try it! box in a Python program that submits that code to sqlite3. Additionally, if you wish to present students with an existing database file as a starting point, you need to attach a file to the submission.
The ace-inline-filter has two file-upload methods, as explained above:
- A separate file-selector UI element on the page.
- A hidden text field on the page that contains the file contents.
However, both these methods assume text files, and sqlite3 database files are binary. So, neither can be used directly. What we need to do instead is encode the sqlite3 database in a text format such as base64, then decode the file in the wrapper script to get the original file back.
Only the second approach is demonstrated here, since it is unlikely that a teacher will wish to ask students to upload their own database files encoded in base64.
To see what's going on here, you will need to view the source for this page (and be prepared to drown a little).
The following text area contains the base-64 encoded version of a simple sqlite3 book database. It would normally be hidden by setting its display attribute to none but is shown here for clarity.
Hidden just below is a <script> element that defines a JavaScript function sqlwrapper, that wraps the SQL from the Ace editor window into a Python program that runs the SQL code using sqlite3.
Now at last the ace-in-line code element, configured to use sql as the ace language and to upload the file encoded in the textarea shown above.
.mode column
.headers on

select * from tbl_book;

-- Output a blank line
.headers off
select '';

-- Add a row and repeat the select
insert into tbl_book values ('boo6', 'My new book name', 'The author', 'The language');
select * from tbl_book;
Using Ace-interactive-filter for applets
The latest version of the ace-interactive-filter plugin allows you to upload files and to read the contents of various textareas or other HTML elements as if they were files. You can also hide the actual code. Consequently it's possible to use the Ace inline filter to embed executable code rather like traditional applets, using any language of your choice. [Which of course, should be Python.]
This approach to applets is, in most cases, much weaker than using JavaScript directly. For example you can't do any event handling or manipulate the DOM directly. But it has the big advantages of:
- Language familiarity (for those who are more familiar with Python than JavaScript)
- The power of Python for more advanced tasks, such as processing CSV files, plotting graphs, numerical analysis, etc.
For example:
Plot grade histogram
Upload a .csv file using the file selector below. The csv file must have a single header row and there must be a grade column containing only grades (E, D, C-, C+, ...). Enter the required column name into the input field beside the file selector and click the Plot histogram button.
Select CSV file:
Column name:
import matplotlib.pyplot as plt
import sys
import csv

GRADES = ['E', 'D', 'C-', 'C', 'C+', 'B-', 'B', 'B+', 'A-', 'A', 'A+']

def main():
    csv_files = [name for name in sys.argv if name.endswith('.csv')]
    if len(csv_files) != 1:
        print(f"I expected to be given exactly one .csv file. Instead I got {len(csv_files)}")
        return

    filename = csv_files[0]
    with open("column_name") as infile:
        column_name = infile.read().strip()
    if column_name == '':
        print("You haven't specified the name of the grades column")
        return
    print(f"Processing {filename}")
    counts = {grade: 0 for grade in GRADES}
    with open(filename, encoding='utf-8-sig') as infile:
        rdr = csv.DictReader(infile)
        for row in rdr:
            try:
                grade = row[column_name].strip()
            except KeyError:
                print(f"File {filename} doesn't have a column {column_name}")
                print("Columns: ", list(row.keys()))
                return
            if grade in GRADES:
                counts[grade] += 1

    axes = plt.axes()
    axes.bar(counts.keys(), counts.values())
    axes.set_title(f"Grade distribution, column {column_name} from file {filename}")
    num_grades = sum(counts.values())
    print(f"{num_grades} grades processed")
    print(f"Pass rate = { 100 * (num_grades - counts['D'] - counts['E']) / num_grades : .1f}%")

main()
The width of Ace-inline code
This paragraph applies only to version 1.3.3 or later.
The width of the in-line code block is determined as follows:
- If the <pre> element containing the code has an explicit style width, that is used for the rendered code block. For example:
<pre class="ace-interactive-code" style="width:500px"> print("Hello Ace") </pre> - If there is no explicit width set, the element width will be that of the enclosing element, e.g. the Moodle main page or a column of a table, or the width of the longest line of code, whichever is greater
Using the data-code-mapper functionality
The data-code-mapper attribute of the ace inline filter "pre" element lets you specify a function that can be used to apply any arbitrary transformation to the code in the box. It has a similar role to the template in a CodeRunner question, but is harder to use as we're in a pure JavaScript environment without recourse to server-side tools like Twig.
The mapper function (a global JavaScript function) takes the code from the Try it! box as a parameter and returns modified code that is then sent to the Jobe server. As an example, we'll show how we can implement the equivalent of the "C-via-python" question type in Moodle. That question type runs a C program using Python. The advantage of doing it that way is that you have complete control over the C compile-and-run process, letting you control compiler settings, linked libraries, execution limits, etc. And of course you can run other languages that are not directly supported by Jobe in this way.
Suppose the answer box contains a trivial Hello world program in C, viz:
#include <stdio.h>
int main() {
    puts("Hello world!");
}
To run that via Python, we need to compile it and run it. In Python, the code we need is, in its most minimal form, something like:
import subprocess
c_code = """.... """  # The above program, for example.
with open("prog.c", "w") as src:
  print(c_code, file=src)
try:
    subprocess.run("gcc -o prog prog.c".split(), check=True)
    subprocess.run(["./prog"], check=True)
except:
    print("Oops, that didn't work")
The code-mapper function required here is then just:
function c_via_python(c_code) {
    return `import subprocess
with open("prog.c", "w") as src:
    print("""${c_code}""", file=src)
try:
    subprocess.run("gcc -o prog prog.c".split(), check=True)
    subprocess.run(["./prog"], check=True)
except:
    print("Oops, that didn't work")
`;
}
That function needs to appear within the page (editing in HTML mode) wrapped in a <script> element.
Lastly, the Ace inline filter element has to include the attributes
data-code-mapper="c_via_python".data-lang="python3"data-ace-lang="c"
The last is required because the code to be sent to Jobe is python but the code being edited on the page is C
And here it is in action (you can view the source of the page to see what it looks like under the hood).
#include <stdio.h>
int main() {
  puts("Hello World!");
}
This is a minimal implementation without checks for the various possible error conditions - a single generic "except" handles all failures. Also it will fail if the C program contains triple-double-quotes anywhere - the c_code parameter should really escape all double-quote characters.